jkpaysys.gov.in : JK Payment System Salary Bill/ Slip Jammu & Kashmir
Organisation : Government of Jammu & Kashmir
Facility Name : JK Payment System Salary Bill/Slip
Applicable State/UT : Jammu & Kashmir
Website : https://jkpaysys.gov.in/
| Want to ask a question / comment on this post? Go to bottom of this page. |
|---|
JKPAYSYS Payment System
JK Payment System (PayManager) provides the common and integrated platform for DDO’s to prepare the all types of bills for booking of expenditure.
Related / Similar Post : Jammu and Kashmir & Ladakh Ladli Beti Scheme

It is also the Pay Bill Preparation System which meant for the Employees of the Government of Jammu & Kashmir. The Software not only provides the facilities for Pay bill Preparation but also Preparation of DA Arrear, Bonus, Arrears and Leave encashment Bills.
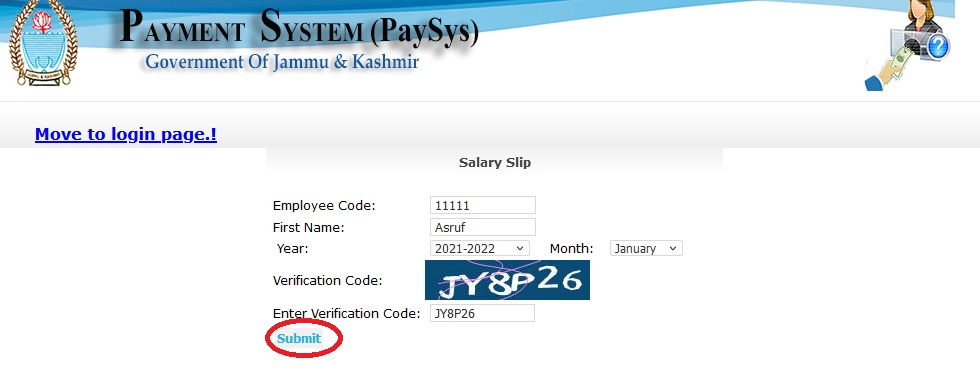
How To View Salary Slip?
Step-1 : Go to the link https://jkpaysys.gov.in/login.aspx
Step-2 : Enter the Employee Code
Step-3 : Enter the First Name
Step-4 : Select Year
Step-5 : Enter the Verification Code
Step-6 : Click on Submit button to view Payslip.
Instructions
1.First of all make sure that all employee details are entered in CPIS Data. Your DDO Codes on CPIS and JKPaysys must be same.
2.Make ensure to update their Basic details (Form 1) and Form 2(A&B) properly in CPIS and verifying them before porting data. In case if you try to port such employees, you will get error while setting employee data in PaySys.
3.Use menu Master->Group Master and create all Bill Categories and Map appropriate Budget Authority with Bill Category. Budget authority Default must be changed with your authority like bcaedu*** etc. In case you fail to do so, you will not be able to view budget while generating bill. Separate Groups can be created for Temporary Employees.
4.Check your Budget available in different schemes under menu Report -> Budget Control Register. Use option Fetch Budget Details on Dashboard to sync your budget.
5.View your DDO Profile. Checker user can make some allowed modification through link Master->DDO Details. In case if he cannot edit his profile, he can drop an email to support-jkpaysys@jk.gov.in.
6.Now Open Master->Employee Info menu.
7.For new users, there are two modes to fetch employees.
8.If you know CPIS-ID of employee enter his CPIS number and fetch him, his details will get populated in the form.
9.If you want to Bulk port the employees, Click on option Fetch CPIS Bulk Data. Make sure all employees fetched. Please don’t Attempt to fetch employees again once they are ported in JK Paysys.
10.Now all employees will be populated on Left side Grid. Search option is given in case you want to search a particular employee.
11.Click on employee name in Left Grid. His details will be populated in the main Form. Select his scheme, Group assigned and other details and update the form.
12.Again Click on employee name as per step 11. Under Salary details Tab make sure his Branch code, Account number, PAN number, HRA entitlement, City Class, GPF number are correct. Branch Code and Account Number must be Checked carefully and confirmed with employee.
13.In Class of City Select appropriate class like Metro, B Class, Other etc. M is for Move employees getting Fixed 2500 HRA. Select Govt Accommodation not Available and mention Place of Posting if HRA is to be given.
14.For NPS employees there is provision of entering his GPF number.
15.Select Employee Status as Active. In case employee is Retired/Transferred/Dead/Duplicate DDO can select Option Inactive. He must mention date of Retirement etc.
16.Now Save/Update the record.
17.Now again on Left Grid click on Employee. Once his record his shown, click on Allowances. Select and fill all allowances entitled to him. Note that Rule based allowances are Auto Filled and are not visible in allowance form. They will get displayed in Employee Details form.
18.Allowances are of two type: Regular and Casual. Click on Casual Allowances in case they are to be given to employee. They are not part of Salary Bills, their bill is separately generated using Menu item 14/15 in this document.
19.Now open Deduction Form. You will see two types of Deductions viz Treasury Deduction (Contra Credit) and DDO Deduction (Included in the net amount of bill).
20.Select Appropriate deduction and Save.
21.In case of State life Insurance SLI deduction, enable SLI in Deduction Form and save. m Then Click on SLI master and insert various policies and amount.
22.In case recoveries like GPF Refund, Advance Pay, HBA etc click on Recovery Master and insert details. These can be later on modified or edited from Checker Login only.
23.Repeat the process for all employees
24.Afterwards modifications will be done only in case there are changes in Allowances/Deduction of employees.
25.Now when master data of employees are set, click on menu Bill Processing->Salary Bill.
26.Select Month- Financial Year- Scheme and Group and then Click on Show Button. Afterwards Salary Bill of the group will be displayed.
27.Note that if Employees in group are not appearing in Bill during Bill Processing, it means you have not saved their record with proper scheme.
28.Generate the Bill only in case you have updated all allowance and deductions of all employees. It is advisable to check Draft Bill before forwarding bill to checker.
29.Thereafter, Click on “Forward Bill to Checker” button, it will generate bill and send it to checker. In case the Button “Forward Bill to Checker” is not visible, it means you don’t have Budget in this scheme.
30.In case Checker returns bill to maker, maker can see bill under Menu item BillProcessing->Rejected Bills.
not salary with two months in jk police department however doesn’t matter
Not showing salary slip since 3 months