How To Apply For Passbook Data Correction in Telangana?
Organisation : Telangana Revenue Department
Facility Name : Application For Passbook Data Correction
Applicable States/UTs : Telangana
Website : https://bhubharati.telangana.gov.in/homePage
| Want to ask a question / comment on this post? Go to bottom of this page. |
|---|
How To Apply For Passbook Data Correction in Telangana?
To apply for Passbook Data Correction in Telangana, you must use the official Bhu Bharati Portal (formerly known as Dharani). This service allows you to rectify errors in the Record of Rights (ROR), such as incorrect names, land extents, or missing survey numbers.
Related / Similar Facility : Telangana Grievance Relating to Inclusion in Prohibited Properties List

Login
1) Visit Bhu Bharati (https://bhubharati.telangana.gov.in/) portal and click on the Login button to avail any service.
2) If not registered with Bhu Bharati, click on the Signup to register into the portal (check user registration manual if required).
3) If already registered with Bhu Bharati, login to the portal by entering the mobile number, password, captcha, and click on the Get OTP button.
4) OTP has been successfully sent to the registered mobile number. Click on the OK button.
5) Enter OTP and click on the Validate OTP button.
6) OTP has been verified successfully. Click on the OTP button.
7) Citizen Dashboard is now open for using any service.
Change of Name
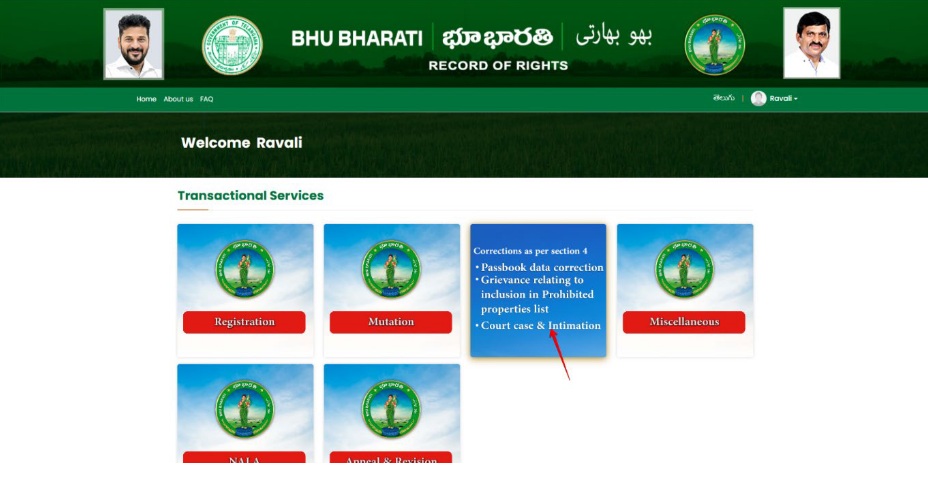
1) To avail the Application for Passbook Data Correction service, hover over ROR Corrections and clickon it.
2) Choose Application for Passbook Data Correction.
3) You can check all the citizen side flows involved in the application and click on the Proceed button tomove further into the application.
4) All the previous applications (if any) related to the Application for Passbook Data Correction for the logged in user populate. Click on the New Request button to make a fresh request.
5) Select the required service, search the applicant record by any of the type provided in the dropdown menu. Here, Passbook No. has been selected and Passbook Number is entered. Now, click on the Fetch button.
6) Pattadar details populate. Enter the Aadhaar Number, select the mode of authentication, and click on the Validate button.
7) Here authentication mode selected is OTP. Enter the OTP and click on the Validate OTP button.
8) When OTP validation is successful, click on the OK button.
9) The details are fetched from the entered Aadhaar Number and the details of the existing Aadhaar Number are fetched from Bhu Bharati. Select the Caste Category.
10) Enter the Communication Address, upload required documents and click on the Submit button.
11) An application number will be generated. Click on the OK button to proceed.
Payment:
12) There are 2 provisions for the application fee payment provided to the citizen. You can pay the fee in the Bhu Bharati portal itself or at Mee Seva.
13) Here, Make Payment in Bhu Bharati is selected. The amount to be paid is displayed. Click on the Make Payment button.
14) Check the checkbox for accepting terms and conditions and click on the Proceed button.
15) You will be redirected to the payment gateway and pay the fee.
Ekyc of Pattadar:
16) For ekyc also there are 2 provisions for the citizen. You can complete ekyc in the Bhu Bharati portal itself or at Mee Seva.
17) Here, Bhu Bharati is selected. Click on the Capture Biometric to capture the fingerprint.
18) Select the device name from the list of devices compatible for Aadhaar based biometric authentication and click on the Verify button.
19) Capture fingerprint.
20) All the personal details from Aadhaar are fetched. Click on the OK button.
21) Ekyc is done successfully. Click on the OK button.
22) Photo from Aadhaar is fetched. Click on the Capture Photo button.
23) Take Snapshot.
24) Captured image along with the Aadhaar image are populated. Click on the Submit button.
25) Now, the application is moved to Tahsildar for further actions.
Change of Land Nature
When selected Change of Land Nature service, the services like Change of Land Classification, Change of Manner in which Land Acquired, Change of land type are the services that are automatically selected.
1) To avail the Application for Passbook Data Correction service, hover over ROR Corrections and click on it.
2) Choose Application for Passbook Data Correction.
3) You can check all the citizen side flows involved in the application and click on the Proceed button to move further into the application.
4) All the previous applications (if any) related to the Application for Passbook Data Correction for the logged in user populate. Click on the New Request button to make a fresh request.
5) Select the required service, search the applicant record by any of the type provided in the dropdown menu. Here, Passbook No. has been selected and Passbook Number is entered. Now, click on the Fetch button.
6) Under the Land Details, select the check box corresponding to the extent of land for which land nature, land classification, land manner, land type need to be changed. Change the required details and provide communication address details.
7) Upload the required documents and click on the Submit button.
8) An application number will be generated. Click on the OK button to proceed.
Payment:
9) There are 2 provisions for the application fee payment provided to the citizen. You can pay the fee in the Bhu Bharati portal itself or at Mee Seva.
10) Here, Make Payment in Bhu Bharati is selected. The amount to be paid is displayed. Click on the Make Payment button.
11) Check the checkbox for accepting terms and conditions and click on the Proceed button.
12) You will be redirected to the payment gateway and pay the fee.
Ekyc of Pattadar:
13) For ekyc also there are 2 provisions for the citizen. You can complete ekyc in the Bhu Bharati portal itself or at Mee Seva.
14) Here, Bhu Bharati is selected. Click on the Capture Biometric to capture the fingerprint.
15) Select the device name from the list of devices compatible for Aadhaar based biometric authentication and click on the Verify button.
16) Capture fingerprint.
17) All the personal details from Aadhaar are fetched. Click on the OK button.
18) Ekyc is done successfully. Click on the OK button.
19) Photo from Aadhaar is fetched. Click on the Capture Photo button.
20) Take Snapshot.
21) Captured image along with the Aadhaar image are populated. Click on the Submit button.
22) Now, the application is moved to Tahsildar for further actions.
Extent Correction
1) To avail the Application for Passbook Data Correction service, hover over ROR Corrections and click on it.
2) Choose Application for Passbook Data Correction.
3) You can check all the citizen side flows involved in the application and click on the Proceed button to move further into the application.
4) All the previous applications (if any) related to the Application for Passbook Data Correction for the logged in user populate. Click on the New Request button to make a fresh request.
5) Select the required service, search the applicant record by any of the type provided in the dropdown menu. Here, Passbook No. has been selected and Passbook Number is entered. Now, click on the Fetch button.
6) Under the Land Details, select the check box corresponding to the extent of land which need to be changed/corrected. Change the required details and provide communication address details.
7) Upload the required documents and click on the Submit button.
8) An application number will be generated. Click on the OK button to proceed.
Payment:
9) There are 2 provisions for the application fee payment provided to the citizen. You can pay the fee in the Bhu Bharati portal itself or at Mee Seva.
10) Here, Make Payment in Bhu Bharati is selected. The amount to be paid is displayed. Click on the Make Payment button.
11) Check the checkbox for accepting terms and conditions and click on the Proceed button.
12) You will be redirected to the payment gateway and pay the fee.
Ekyc of Pattadar:
13) For ekyc also there are 2 provisions for the citizen. You can complete ekyc in the Bhu Bharati portal itself or at Mee Seva.
14) Here, Bhu Bharati is selected. Click on the Capture Biometric to capture the fingerprint.
15) Select the device name from the list of devices compatible for Aadhaar based biometric authentication and click on the Verify button.
16) Capture fingerprint.
17) All the personal details from Aadhaar are fetched. Click on the OK button.
18) Ekyc is done successfully. Click on the OK button.
19) Photo from Aadhaar is fetched. Click on the Capture Photo button.
20) Take Snapshot.
21) Captured image along with the Aadhaar image are populated. Click on the Submit button.
22) Now, the application is moved to Tahsildar for further actions.